Posts

Difference between Background and Real-Time Workflows

Background Workflow Operates in the background, requiring users to refresh pages to see changes after saving records, however, this doesn't interrupt users' ability to continue their work. If a step fails in the background workflow, the process halts at the failure step, and changes made by previous steps are kept.  Errors do not appear as pop-ups; administrators must check system job logs to identify failed processes. Background workflows are designed to minimize resource usage, ensuring they do not disrupt system processing. Troubleshooting background workflows is straightforward as it's easy to monitor which process failed at which point. Real-Time Workflow Changes are instantly reflected upon saving a record, without requiring page refreshes. Users may need to wait briefly for the process to complete, but it's not typically noticeable. If a step fails in a real-time workflow, a pop-up error message notifies users of the failed process. Real-time workflows typically ...
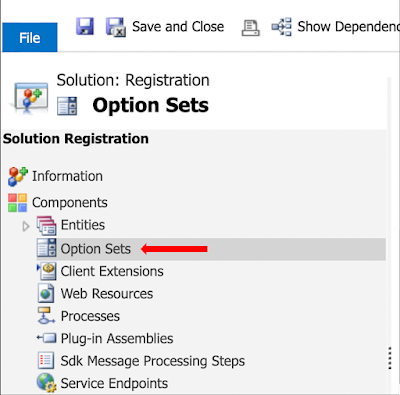
Global Option Set in Dynamics 365

Image
Global Option Sets are preferred when you need to use the same set of options across multiple entities within your Dynamics 365 environment. Creating a global option set makes it easy to maintain consistency and ensure that any changes made to the options are reflected across all entities that use that option set. On the other hand, local option sets are specific to a single entity. They are useful when you need to define options that are unique to a particular entity and are not applicable elsewhere in your Dynamics 365 solution. To create a Global Option Set to use in multiple entities in Dynamics 365, you can follow these steps: 1. Navigate to the desired solution in Dynamics 365. 2. Select "Option Sets" in the left menu bar. This will bring up a list of existing option sets. 3. Click on the "New" button to create a new option set. 4. Enter the "Display Name" for the option set. This is the name that will be displayed to users when they interact with fi...

Microsoft Dynamics 365 Sales 2024 Wave 1

Image
Here's a detailed overview of the new Microsoft updates for Dynamics 365 Sales in the 2024 wave 1, covering Sales Engagement, Sales Execution, Sales Force Engagement, Sales Experiences, and Co-pilot for AI innovation: Sales Engagement  The introduction of "sequence steps" in sales is a significant enhancement for task management within Dynamics 365 Sales. This feature allows users to gain comprehensive insights into assigned tasks by providing detailed information about the individuals involved in each step of a sequence. Moreover, it offers visibility into the time spent by team members on specific tasks, enabling better understanding and planning of workloads. Importantly, multiple sequences can be attached to a single record, providing flexibility in managing complex workflows. Additionally, sales managers or operative teams have the authority to assign sequences to team members, facilitating seamless collaboration and ensuring accountability throughout the process. Sa...

Understanding Business Rules in D365

Image
Business rules are crucial in streamlining processes and automating tasks within Dynamics 365. They effortlessly handle things like setting default values for fields, adjusting one field based on another, toggling field visibility, and even locking or unlocking fields as needed. These rules work behind the scenes, making processes smoother and more efficient without requiring constant manual intervention.  Various components in Business rules are used to perform various tasks, below is an example of the “Set Field Value” component which is used to automatically set the Gender field value in a form based on the user-selected prefix; if the prefix is "Ms", “Miss” or "Mrs," set the Gender to Female; otherwise, set it to Male. Begin by navigating to the form where you want to implement the Business Rule. Click on the 'Business Rule' icon and click on the 'New Business Rule' button. After initiating the Business Rule, simply click the down arrow to enter ...

Create Schedule Cloud Flow

Image
Writing a scheduled cloud flow is very convenient when we do not have to add any flow trigger and it runs at a scheduled time. Here is a Scheduled Power Automate Cloud Flow which runs every day to check customer auto-debit date and sends mail to the customer the day before the auto-debit is scheduled. Follow these steps to initiate the scheduled workflow: 1. Navigate to 'Power Apps.' 2. Click on 'Flows.' 3. Choose 'New flow.' 4. Opt for 'Scheduled Cloud Flow.' You are now prompted to: 1. Provide a name for your cloud flow. 2. Choose the start date and time for the flow. 3. Specify the recurrence frequency, which can be set to every minute, hour, day, week, or month. These settings allow you to tailor the scheduled workflow according to your specific requirements. After initiating the scheduled workflow, proceed by clicking on "Next Step" and then select 'List Rows' from 'Microsoft Dataverse.' The 'List Rows' action enabl...