Posts

Customizing Dynamics 365 with JavaScript

Image
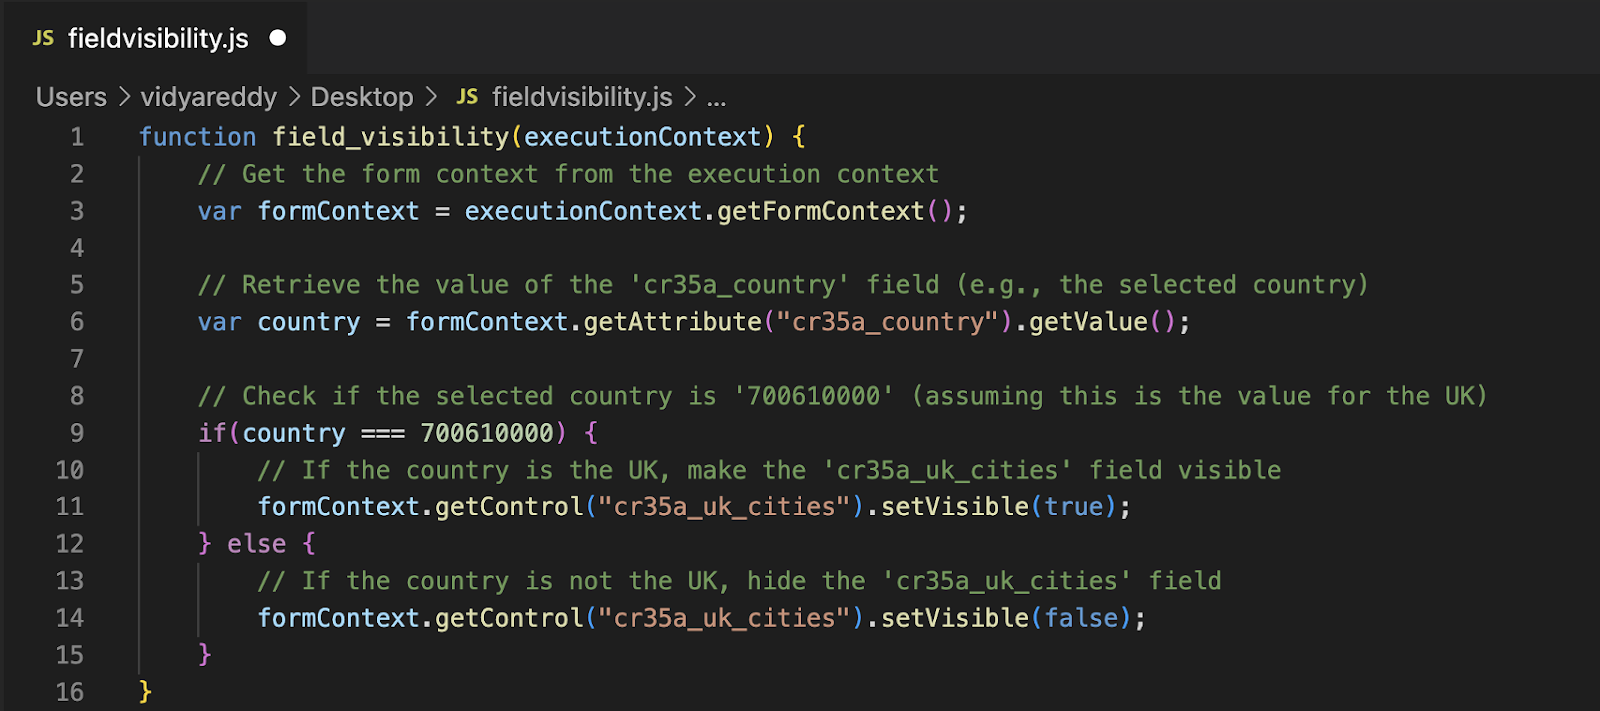
 Microsoft Dynamics 365 (D365) is a great tool for managing business processes, but to make it work best for your organization, using JavaScript can be very helpful. JavaScript lets you add custom features that improve how users interact with the system and make tasks easier to complete. In this post, we'll look at some simple JavaScript code examples for D365 that can help you do things like show or hide fields, check user input, create alert messages, and automatically set field values. 1. Controlling Field Visibility           Dynamic forms improve the user experience by showing only the fields that are relevant based on the user’s input. For example, you can use JavaScript to control which fields are displayed depending on the user's selections. In the following example, we'll look at how to show or hide a field based on the country selected from an option set. If the user chooses "UK," an additional field will appear, allowing them to select citie...

Guide to Accessing D365 Web Resources

Image
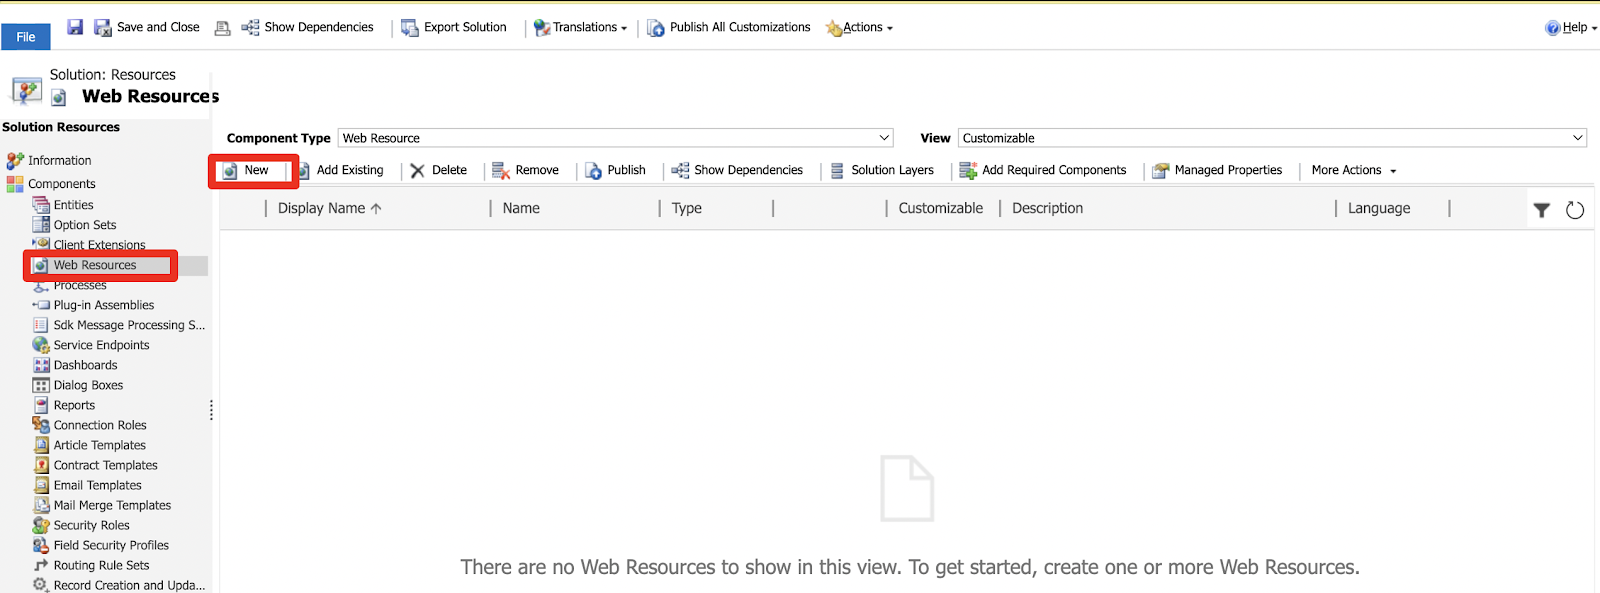
Microsoft Dynamics 365 web resources are essential for customizing and extending your CRM functionalities. This guide will help you understand what D365 web resources are and how to access them step-by-step.  Web resources in D365 are virtual files stored in the CRM database and are used to add custom functionalities such as HTML, JavaScript, CSS, XML, and image files. They are commonly used for custom user interfaces, adding scripts to forms, styling elements, and custom web pages embedded within D365. A Step-by-Step Guide to access D365 Web Resources:  Navigate to the desired solution in Dynamics 365, and click on Web Resources in the left pane within the Solution.  To add a new web resource, click on “New”.  Fill in the required fields (Name, Display Name, Type), and upload your resource file. Or to edit an existing web resource, select it from the list of existing web resources and click "Edit" to make the necessary changes and save. After adding or editing web r...

Editable Grid for Views in D365

Image
Editable grids on views in Dynamics 365 represent a significant advancement in data management efficiency. This feature allows users to seamlessly edit or delete records directly within the grid view, eliminating the need to navigate to individual forms for data entry. By enabling inline editing and bulk updates, editable grids empower users to swiftly make changes and observe real-time results, transforming the way data is handled within Dynamics 365. Whether it involves updating multiple records at once or making quick edits on the fly, editable grids offer unmatched flexibility and convenience, significantly enhancing the user experience. To enable editable grids on views for an entity in Dynamics 365, follow these straightforward steps: 1. Navigate to the solution and add the entity where changes are desired. 2. Within the solution, under entities, select the relevant entity. Click on the entity and proceed to controls tab. 3. Click on "Add Control," then scroll down and ...

Difference between Background and Real-Time Workflows

Background Workflow Operates in the background, requiring users to refresh pages to see changes after saving records, however, this doesn't interrupt users' ability to continue their work. If a step fails in the background workflow, the process halts at the failure step, and changes made by previous steps are kept.  Errors do not appear as pop-ups; administrators must check system job logs to identify failed processes. Background workflows are designed to minimize resource usage, ensuring they do not disrupt system processing. Troubleshooting background workflows is straightforward as it's easy to monitor which process failed at which point. Real-Time Workflow Changes are instantly reflected upon saving a record, without requiring page refreshes. Users may need to wait briefly for the process to complete, but it's not typically noticeable. If a step fails in a real-time workflow, a pop-up error message notifies users of the failed process. Real-time workflows typically ...

Global Option Set in Dynamics 365

Image
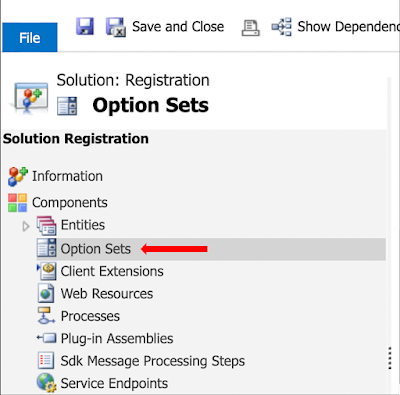
Global Option Sets are preferred when you need to use the same set of options across multiple entities within your Dynamics 365 environment. Creating a global option set makes it easy to maintain consistency and ensure that any changes made to the options are reflected across all entities that use that option set. On the other hand, local option sets are specific to a single entity. They are useful when you need to define options that are unique to a particular entity and are not applicable elsewhere in your Dynamics 365 solution. To create a Global Option Set to use in multiple entities in Dynamics 365, you can follow these steps: 1. Navigate to the desired solution in Dynamics 365. 2. Select "Option Sets" in the left menu bar. This will bring up a list of existing option sets. 3. Click on the "New" button to create a new option set. 4. Enter the "Display Name" for the option set. This is the name that will be displayed to users when they interact with fi...

Microsoft Dynamics 365 Sales 2024 Wave 1

Image
Here's a detailed overview of the new Microsoft updates for Dynamics 365 Sales in the 2024 wave 1, covering Sales Engagement, Sales Execution, Sales Force Engagement, Sales Experiences, and Co-pilot for AI innovation: Sales Engagement  The introduction of "sequence steps" in sales is a significant enhancement for task management within Dynamics 365 Sales. This feature allows users to gain comprehensive insights into assigned tasks by providing detailed information about the individuals involved in each step of a sequence. Moreover, it offers visibility into the time spent by team members on specific tasks, enabling better understanding and planning of workloads. Importantly, multiple sequences can be attached to a single record, providing flexibility in managing complex workflows. Additionally, sales managers or operative teams have the authority to assign sequences to team members, facilitating seamless collaboration and ensuring accountability throughout the process. Sa...

Understanding Business Rules in D365

Image
Business rules are crucial in streamlining processes and automating tasks within Dynamics 365. They effortlessly handle things like setting default values for fields, adjusting one field based on another, toggling field visibility, and even locking or unlocking fields as needed. These rules work behind the scenes, making processes smoother and more efficient without requiring constant manual intervention.  Various components in Business rules are used to perform various tasks, below is an example of the “Set Field Value” component which is used to automatically set the Gender field value in a form based on the user-selected prefix; if the prefix is "Ms", “Miss” or "Mrs," set the Gender to Female; otherwise, set it to Male. Begin by navigating to the form where you want to implement the Business Rule. Click on the 'Business Rule' icon and click on the 'New Business Rule' button. After initiating the Business Rule, simply click the down arrow to enter ...